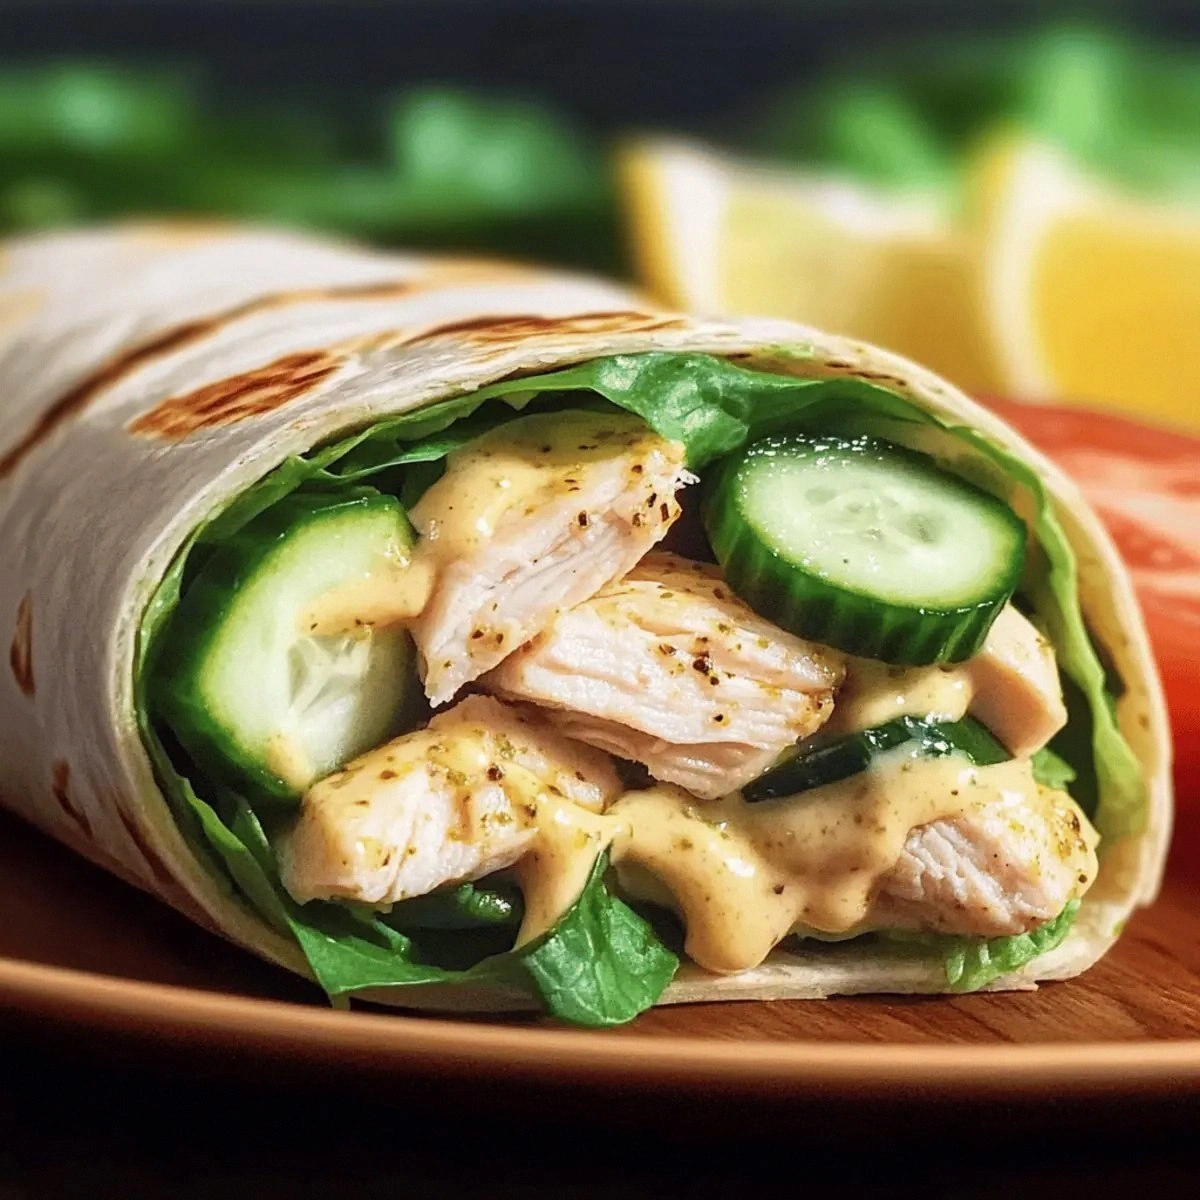
Picture this: I’m standing in my kitchen, a half‑finished stir‑fry cooling on the counter, the timer on the oven flashing red like an impatient traffic light, and my roommate daring me to whip up something that would make her forget about the pizza delivery she’d just ordered. I laughed, grabbed the chicken, and whispered, “Watch me turn this kitchen into a five‑star deli.” The result? Lemon Pepper Chicken Wraps that are so bright, buttery, and zingy they could convince a citrus‑phobic aunt to become a lemon lover. I dare you to taste this and not go back for seconds.
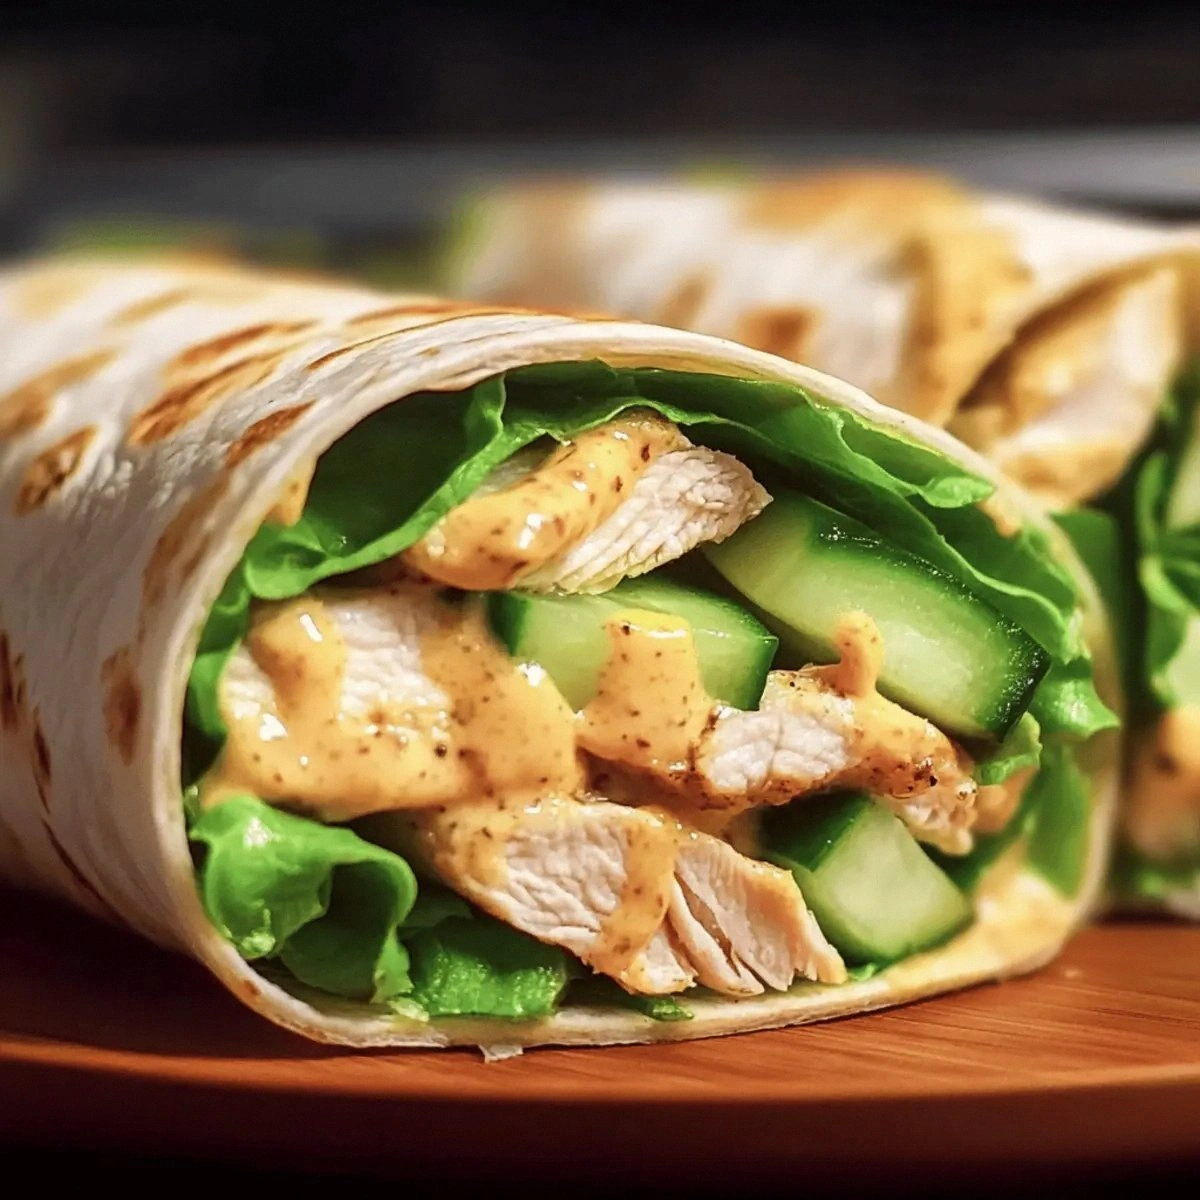
The moment the chicken hits the pan, you hear that sizzle that sings like a rock‑concert drum solo, and the aroma of lemon pepper seasoning erupts, filling the room with a citrusy punch that makes your nose do a happy dance. The sauce—creamy, tangy, with just enough peppery bite—coats the chicken like a silk scarf, while the fresh crunch of lettuce, tomato, cucumber, and red onion adds a garden‑fresh snap that contrasts beautifully with the warm, tender meat. The tortillas, lightly toasted, become a buttery cradle that holds everything together without sogging, giving each bite a satisfying chew that shatters like thin ice under a spring sun.
Most recipes get this completely wrong. They either drown the chicken in a swamp of sauce or skimp on the seasoning, leaving a bland, limp wrap that feels like a culinary disappointment. This version, however, balances the bright zing of lemon pepper with the cool creaminess of Greek yogurt and mayo, creating a sauce that is both luscious and light—like a cloud that decided to take a dip in a citrus pond. And the secret? A splash of fresh lemon juice added at the very end to brighten the whole thing, a technique most home cooks overlook.
But I’m not just bragging; I’m sharing the exact steps that turned my kitchen disaster into a crowd‑pleasing masterpiece. I’ll be honest — I ate half the batch before anyone else got to try it, and the look on my roommate’s face when she took that first bite was worth every stolen morsel. Let me walk you through every single step — by the end, you’ll wonder how you ever made it any other way.
What Makes This Version Stand Out
- Taste: The lemon pepper seasoning delivers a bold citrus‑pepper punch that’s balanced by a creamy sauce, creating a flavor duet that sings in perfect harmony.
- Texture: Crispy tortilla edges meet tender chicken and a garden‑fresh crunch, giving each bite a multi‑layered mouthfeel that keeps you chewing happily.
- Simplicity: Only ten core ingredients, all pantry‑friendly, mean you can throw this together on a weeknight without a grocery run.
- Uniqueness: The blend of Greek yogurt and mayo for the sauce is a game‑changer, offering richness without heaviness.
- Crowd Reaction: I’ve seen grown‑ups and kids alike line up for seconds; the bright flavor profile is universally appealing.
- Ingredient Quality: Fresh chicken breast and crisp vegetables elevate the dish from ordinary to restaurant‑grade.
- Cooking Method: Pan‑searing locks in juices, while a quick toast of the tortilla adds that coveted crunch.
- Make‑Ahead Potential: The sauce can be prepared ahead of time, and the chicken stores beautifully for next‑day lunches.
Inside the Ingredient List
The Flavor Base
Chicken Breast (1 pound): This lean protein is the canvas for our lemon pepper masterpiece. Its mild flavor lets the seasoning shine, and the quick sear keeps it juicy. If you skip it, you lose the tender bite that makes the wrap feel hearty. For a richer taste, opt for bone‑in, skin‑on thighs, but trim the excess fat for a lighter result.
Lemon Pepper Seasoning (2 tablespoons): The star of the show, this blend of dried lemon zest and cracked black pepper adds a bright, aromatic kick. Using a high‑quality seasoning ensures the zest isn’t bitter. If you’re feeling adventurous, grind fresh pepper and zest a lemon yourself for an even fresher punch.
The Texture Crew
Tortillas (4 medium): Choose soft, flour tortillas for pliability; corn works too if you crave a rustic feel. The tortilla’s role is to hold everything together without falling apart. If you overfill, the wrap will split—so keep the filling moderate for a perfect bite.
Lettuce (2 cups), Tomato (1 cup), Cucumber (1 medium), Red Onion (¼ medium): These veggies bring crispness, juiciness, and a hint of sweetness. Their freshness cuts through the richness of the sauce, creating a balanced mouthfeel. If you’re out of cucumber, try thinly sliced radish for a peppery crunch.
The Unexpected Star
Greek Yogurt (¼ cup) & Mayonnaise (¼ cup): This duo creates a sauce that’s velvety yet light. The yogurt adds tang, while the mayo provides silkiness. Skipping either will either make the sauce too sharp or too heavy; together they hit the sweet spot.
Lemon Juice (1 tablespoon): A final splash of fresh lemon juice brightens the sauce, preventing it from feeling dull. It also helps the flavors meld together, like a conductor uniting an orchestra.
Everything's prepped? Good. Let's get into the real action…
The Method — Step by Step
Start by patting the chicken breast dry with paper towels; moisture is the enemy of a good sear. Slice the chicken into thin strips—about a quarter‑inch wide—so they cook quickly and evenly. Toss the strips with the 2 tablespoons of lemon pepper seasoning, making sure each piece is evenly coated. Let them rest for 5 minutes while you heat the skillet; this brief marination lets the flavors penetrate the meat.
Kitchen Hack: Sprinkle a pinch of kosher salt on the chicken before seasoning; it draws out moisture, giving a crispier exterior.Heat a large skillet over medium‑high heat and add a tablespoon of olive oil. Once the oil shimmers, lay the chicken strips in a single layer—do not overcrowd, or you’ll steam them. Listen for that satisfying sizzle; the edges should start to turn golden within 2‑3 minutes. Flip the strips and cook the other side until the interior reaches 165°F (74°C), about another 2‑3 minutes. The chicken should be lightly browned, with a fragrant citrus‑pepper crust.
While the chicken finishes, whisk together the Greek yogurt, mayonnaise, and lemon juice in a small bowl. The sauce should be smooth, glossy, and just a touch tangy. Taste and adjust with a pinch more lemon pepper if you crave extra zing. Set the sauce aside; it will thicken slightly as it rests, creating a perfect coating for the wraps.
Now, toast the tortillas. Heat a clean, dry skillet over medium heat and place a tortilla on it. After 20 seconds, flip and toast the other side for another 20 seconds—just enough to get a light golden brown. This step is crucial; it prevents the wrap from becoming soggy once the sauce is added. Stack the toasted tortillas on a plate and keep them warm under a clean kitchen towel.
Time to assemble the veggies. Roughly chop the lettuce, dice the tomato, slice the cucumber into half‑moons, and thinly slice the red onion. Toss them together in a bowl with a drizzle of olive oil, a pinch of salt, and a squeeze of lemon juice. The vegetables should look glossy and be lightly seasoned—this layer adds brightness and crunch that will contrast the warm chicken.
Lay a toasted tortilla flat on your work surface. Spread a generous spoonful of the creamy lemon pepper sauce across the center, using the back of the spoon to smooth it out. Remember, the sauce is the glue that holds everything together—don’t be shy.
Place a handful of the seared chicken strips on top of the sauce, then pile on the seasoned veggie mix. The colors should pop—golden chicken, vibrant greens, ruby tomatoes, and pale cucumbers. This visual cue tells you the wrap is ready for the final touch.
Fold the bottom edge of the tortilla up over the filling, then fold the sides in and roll tightly. If you’re worried about the wrap falling apart, secure it with a toothpick or wrap it in parchment for a neat presentation.
Watch Out: Overfilling the wrap can cause it to split when you bite. Keep the filling to about a third of the tortilla’s surface for structural integrity.Repeat the assembly process for the remaining tortillas. Once all four wraps are ready, let them rest for a minute—this allows the sauce to meld with the chicken and veggies, creating a unified flavor profile. Slice each wrap in half on a diagonal for that Instagram‑ready look.
Serve immediately, or if you’re prepping ahead, cover the wraps with foil and store in the refrigerator for up to 24 hours. The sauce will stay creamy, and the chicken stays tender. When reheating, a quick 30‑second blast in a hot pan revives the tortilla’s crunch without drying out the filling. And now the fun part—dig in and watch everyone ask for seconds.
That's it — you did it. But hold on, I've got a few more tricks that'll take this to another level…
Insider Tricks for Flawless Results
The Temperature Rule Nobody Follows
Never start cooking chicken straight from the fridge; let it sit at room temperature for 15 minutes. This small step ensures even cooking and prevents the outside from over‑cooking while the interior stays cold. I once tried to skip this and ended up with a rubbery exterior—lesson learned.
Why Your Nose Knows Best
When the chicken is searing, trust your sense of smell. The moment you detect a fragrant citrus‑pepper aroma, you know the seasoning has adhered perfectly. If the scent is faint, increase the heat slightly—this signals the Maillard reaction is happening.
The 5‑Minute Rest That Changes Everything
After searing, let the chicken rest for five minutes before slicing. This allows the juices to redistribute, keeping each bite moist. Cutting too early releases those juices onto the cutting board, resulting in dry strips.
Layering Sauce for Maximum Creaminess
Instead of mixing the sauce all at once, drizzle half over the chicken while it cooks, then finish with the remaining sauce after plating. This creates a layered creaminess that coats every bite without becoming soggy.
Wrap Tight, Not Tight‑Wound
When rolling the tortilla, use a gentle but firm pressure. Too loose and the wrap falls apart; too tight and the tortilla tears. Think of it like a burrito—firm enough to hold, but flexible enough to bite through.
Creative Twists and Variations
This recipe is a playground. Here are some of my favorite ways to switch things up:
Spicy Kick
Add a teaspoon of sriracha to the sauce for a heat‑laden version. The heat pairs beautifully with the lemon pepper, creating a sweet‑heat balance that will thrill spice lovers.
Herbaceous Delight
Stir in chopped fresh dill or mint into the sauce for an herb‑forward twist. The herb notes brighten the dish further, making it perfect for spring picnics.
Avocado Cream
Replace half of the Greek yogurt with mashed avocado. This adds a buttery richness and a vibrant green hue, turning the wrap into a visual and textural treat.
Whole‑Wheat Wrap
Swap the flour tortillas for whole‑wheat or spinach tortillas for added fiber and a subtle nutty flavor. The earthy undertones complement the lemon pepper beautifully.
Grilled Veggie Upgrade
Grill the cucumber and tomato slices before adding them. The char adds smoky depth, making the wrap feel more sophisticated.
Protein Power
Use cooked shrimp or sliced turkey breast instead of chicken for a different protein profile. Both work well with the citrus‑pepper sauce, offering variety for meal‑prep enthusiasts.
Storing and Bringing It Back to Life
Fridge Storage
Place the assembled wraps in an airtight container, separating each with parchment to prevent sticking. They’ll stay fresh for up to 24 hours. Before serving, give them a quick 30‑second warm‑up in a skillet to revive the tortilla’s crispness.
Freezer Friendly
Wrap each tortilla tightly in foil, then place them in a freezer‑safe zip‑lock bag. They freeze well for up to 2 months. To reheat, unwrap, microwave for 60 seconds, then finish in a hot pan for 2 minutes per side to restore the crunch.
Best Reheating Method
Add a tiny splash of water (about a teaspoon) to the pan before reheating; the steam helps the sauce regain its creamy texture without drying out. Cover the pan briefly to trap steam, then uncover to crisp the tortilla.